階層化されたXML ドキュメントをフラット化する方法(ASN EDI ドキュメントのフラット化)
EDI Mapping projects in Arc may require “flattening” XML: taking a hierarchical XML structure and removing the hierarchy. Often, mapping projects that involve Advanced Shipping Notice documents (i.e. X12 856’s or EDIFACT DESADV’s) require this flattening. Specifically, the HLLoop structures within tehse documents need to be flat, as described in the HLLoop Structure section.
This guide provides an overview of how to flatten XML structures in CData Arc, and includes an example of mapping shipment data into a flat HLLoop format. The same principles can be applied to other XML Mapping projects in which hierarchy should be removed from the source data.
Table of Contents
EDI Mapping in Arc
Arc uses XML as the common medium for data transformation, so all EDI mapping projects involve mapping a source XML structure onto a destination XML structure. All XML Mapping projects use the XML Map Connector to perform this transformation.
This guide will focus on the Loop Node feature within the XML Map Connector, which allows for flattening XML structures. It is strongly recommended to read the Using the Designer section of the XML Map Connector documentation prior to following this guide, since the effective use of Loop Nodes requires an understanding of Foreach mapping relationships within Arc.
HLLoop Structure
HLLoops can contain 4 different categories of shipping data:
- Data specific to the entire Shipment (S)
- Data specific to each Order (O) fulfilled by that shipment
- Data specific to each Package (P) required to fulfill the order
- Data specific to each Item (I) contained by the packages
These ‘S’ (Shipment), ‘O’ (Order), ‘P’ (Package), and ‘I’ (Item) codes produce a natural hierarchy: Shipments contain Orders, Orders contain Packages, and Packages contain Items. However, in an Advanced Shipping Notice document, this hierarchy is represented in an unusual way.
HL Siblings
All HLLoop structures are siblings (rather than having a parent-child relationship), regardless of whether they contain Shipment, Order, Package, or Item data. In other words, the hierarchy described above is not represented by some HLLoop structures being ‘contained within’ (i.e. being a child of) other HLLoops. The lack of parent-child relationships is what makes the HLLoops “flat”.
Instead of parent-child hierarchy, HLLoops have an HL segment containing three special elements that encode the hierarchy:
- HL01 - The “hierarchical identifier” that identifies this segment/loop (starting at 1 and incrementing)
- HL02 - The identifier of the parent for this segment/loop (‘0’ indicates no parent)
- HL03 - The code for this segment/loop: ‘S’, ‘0’, ‘P’, or ‘I’
The HL02 element points to another HLLoop that is the current loop’s “parent”. As a simple example, take two HL segments where one is a Shipment (‘S’) and the other is an Order (‘O’) belonging to that shipment:
<HLLoop1 type="Loop">
  <HL type="Segment">
    <HL01>1</HL01>
    <HL02>0</HL02>
    <HL03>S</HL03>
  </HL>
</HLLoop1>
<HLLoop1>
  <HL type="Segment">
    <HL01>2</HL01>
    <HL02>1</HL02>
    <HL03>O</HL03>
  </HL>
</HLLoop1>
Start with the first HLLoop:
- HL01 - 1 (this identifies the loop for future reference)
- HL02 - 0 (this indicates that the loop has no parent; ‘Shipment’ is the top of the HL hierarchy and so does not have a parent)
- HL03 - S (this identifies the loop as representing a Shipment)
Then the second HLLoop:
- HL01 - 2 (this identifies the loop)
- HL02 - 1 (this indicates that the loop identified by ‘1’ is this loop’s parent; in other words this Order “belongs” to the previous Shipment)
- HL03 - O (this identifies the loop as an Order)
This principle is extended to all HLLoops: each loop gets a hierarchical identifier, and each loop references that identifier to indicate which previous loop it “belongs” to. As a result, the HL segment data has an encoded hierarchy despite the fact that the HLLoops are siblings and not parents-children.
Differences From Source Structure
When generating an ASN, the source data is often taken from a back-end system like a database. In the source data, hierarchy between Shipments, Orders, Packages, and Items is typically represented via parent-child relationships (e.g. database tables linked with a foreign key such that one table is the parent of another).
As a result, many ASN mapping projects require flattening the parent-child relationships into siblings, then adding the appropriate HL01/HL02 values to preserve the flattened hierarchy. This guide will walk through both the flattening and the assignment of hierarchy identifier values to generate valid X12 856 and EDIFACT DESADV documents.
Flattening XML
This section will use a simple example to demonstrate the concepts behind flattening XML in Arc. These concepts will then be applied to HLLoops specifically in the next section.
When mapping an ASN with the XML Map Connector, Foreach loop relationships need to be established for the Shipments, Orders, Packages, and Items in the source data (for help understanding the “Foreach” relationships, please see the Using the Designer section of the XML Map Connector documentation).
Typically, establishing Foreach relationships between the source and destination (e.g. between the source data and the ASN) will preserve parent-child hierarchy. In order to remove this hierarchy, The XML Map Connector mapping needs to include Loop Nodes instead of simply mapping Parent nodes in the Source onto Parent nodes in the Destination.
Loop Nodes
Loop Nodes in the XML Map Connector provide a way to establish a Foreach mapping relationship without adding hierarchy in the output XML. The following simple example illustrates how Loop Nodes can flatten hierarchy during an XML mapping.
Example Input
Take the following simple XML as sample input:
<Items>
  <Container>
    <Data>5</Data>
  </Container>
  <Container>
    <Data>8</Data>
  </Container>
</Items>
Notice the parent-child hierarchy between Container and Data; the Data elements are children of Container elements. To flatten this sample Input, we want to bring the Data elements “outside” of the Container elements and remove that level of hierarchy.
Example Output
Once flattened, the above sample data would look like the following:
<Items>
  <Data>5</Data>
  <Data>8</Data>
</Items>
The mapping provided in the next subsection will accomplish the removal of hierarchy displayed in the above output.
Example Mapping
To retrieve all of the data within each Container/Data element, a Foreach relationship must be established between the Container element in the source and some node in the destination. However, in order to flatten the data and remove hierarchy, we do not want an element in the output that corresponds to the Container element in the input (we just want the Data element without Container).
The Loop Node fills this role: A virtual node that allows for establishing Foreach relationships without actually appearing in the output data as an XML element.
To start, first upload the Source and Destination XML in an XML Map Connector so that the visual designer displays the XML structure as a tree:
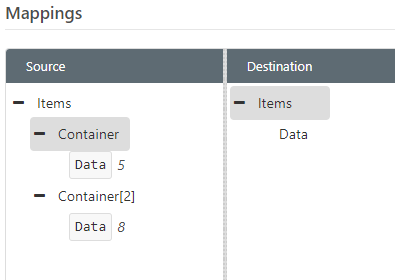
The next step is to establish the Foreach relationships in the mapping. The Source node for this Foreach will be Container, but since we do not want a corresponding XML element in the Destination, we need to create a new Loop Node (by right-clicking under the Items element and selecting ‘New Loop’).
Once the Loop Node is created, the Foreach relationship can be established by dragging the Container from the Source onto the new Loop Node in the Destination; then, the Data element in the Source maps cleanly onto the Data element in the Destination:
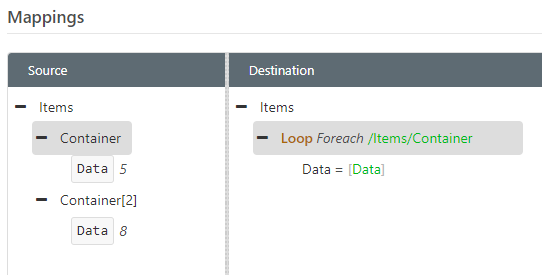
This is all that is required for the mapping. Since the Loop Node will not appear in the output, the only elements other than the root Items element will be each Data element in the source, as depicted in the example output.
HLLoop Mapping
This section will apply the “flattening” principles from the previous section to actual HL segments, and introduce the scripting required to assign each HL segment the identifiers that encode the hierarchy in the document.
Like all mapping projects, this example will start with sample input (Source) and output (Destination) structures, then move on to creating the mapping between the two structures.
Input
First, here is the sample shipping data, which may have been pulled from a back-end system like a database:
<Items>
  <Shipment>
    <ShipmentId>1234</ShipmentId>
    <Order>
      <OrderNum>PO111111</OrderNum>
      <Package>
        <PackageId>PACKAGE1</PackageId>
        <ItemLoop>
          <ItemId>ITEM_1</ItemId>
        </ItemLoop>
        <ItemLoop>
          <ItemId>ITEM_2</ItemId>
        </ItemLoop>
      </Package>
      <Package>
        <PackageId>PACKAGE2</PackageId>
        <ItemLoop>
          <ItemId>ITEM_1</ItemId>
        </ItemLoop>
        <ItemLoop>
          <ItemId>ITEM_3</ItemId>
        </ItemLoop>
      </Package>
    </Order>
  </Shipment>
</Items>
Note that the data hierarchy is represented by parent-child relationships: Orders are children of Shipment, Packages are children of Orders, and Items are children of Packages.
Output
The Output should be an XML representation of an ASN document, including the HLLoop content as sibling elements with hierarchy encoded in the hierarchy identifier values. Below is an example document:
<Interchange xmlns:xsi="http://www.w3.org/2001/XMLSchema-instance">
  <FunctionalGroup>
    <TransactionSet>
      <TX-00401-856 type="TransactionSet">
        <Meta>
          <ST01>856</ST01>
          <ST02>0001</ST02>
        </Meta>
        <BSN type="Segment">
          <BSN01>00</BSN01>
          <BSN02>0403734501</BSN02>
          <BSN03>20150708</BSN03>
          <BSN04>162859</BSN04>
        </BSN>
        <DTM type="Segment">
          <DTM01>011</DTM01>
          <DTM02>20150708</DTM02>
        </DTM><HLLoop1>
          <HL>
            <HL01>1</HL01>
            <HL02>0</HL02>
            <HL03>S</HL03>
          </HL>
          <TD3>
            <TD301>RR</TD301>
            <TD302>SEAU</TD302>
            <TD303>1234567</TD303>
          </TD3>
        </HLLoop1><HLLoop1>
          <HL>
            <HL01>2</HL01>
            <HL02>1</HL02>
            <HL03>O</HL03>
          </HL>
          <PRF>
            <PRF01>PO111111</PRF01>
          </PRF>
        </HLLoop1><HLLoop1>
          <HL>
            <HL01>3</HL01>
            <HL02>2</HL02>
            <HL03>P</HL03>
          </HL>
          <MAN>
            <MAN01>UC</MAN01>
            <MAN02>PACKAGE1</MAN02>
          </MAN>
        </HLLoop1><HLLoop1>
          <HL>
            <HL01>4</HL01>
            <HL02>3</HL02>
            <HL03>I</HL03>
          </HL>
          <MAN>
            <MAN01>UC</MAN01>
            <MAN02>ITEM_1</MAN02>
          </MAN>
        </HLLoop1><HLLoop1>
          <HL>
            <HL01>5</HL01>
            <HL02>3</HL02>
            <HL03>I</HL03>
          </HL>
          <MAN>
            <MAN01>UC</MAN01>
            <MAN02>ITEM_1</MAN02>
          </MAN>
        </HLLoop1><HLLoop1>
          <HL>
            <HL01>6</HL01>
            <HL02>2</HL02>
            <HL03>P</HL03>
          </HL>
          <MAN>
            <MAN01>UC</MAN01>
            <MAN02>PACKAGE1</MAN02>
          </MAN>
        </HLLoop1><HLLoop1>
          <HL>
            <HL01>7</HL01>
            <HL02>6</HL02>
            <HL03>I</HL03>
          </HL>
          <MAN>
            <MAN01>UC</MAN01>
            <MAN02>ITEM_1</MAN02>
          </MAN>
        </HLLoop1><HLLoop1>
          <HL>
            <HL01>8</HL01>
            <HL02>6</HL02>
            <HL03>I</HL03>
          </HL>
          <MAN>
            <MAN01>UC</MAN01>
            <MAN02>ITEM_1</MAN02>
          </MAN>
        </HLLoop1>
        <CTT type="Segment">
          <CTT01>4</CTT01>
        </CTT>
      </TX-00401-856>
    </TransactionSet>
  </FunctionalGroup>
</Interchange>
The focus of this guide is the HLLoop1 structures in the TransactionSet; additional segments are included in this example output so that it is a valid X12 document (and can be converted into X12 via the X12 Connector).
Creating the Mapping
This section walks through each step required to create a mapping that transforms the above sample input into the desired sample output.
Template Files
The first step in any mapping is uploading the sample Source and Destination structures as template files in the XML Map Connector. Once uploaded, the visual designer of the connector will populate with the XML tree structure for both the Source and Destination.
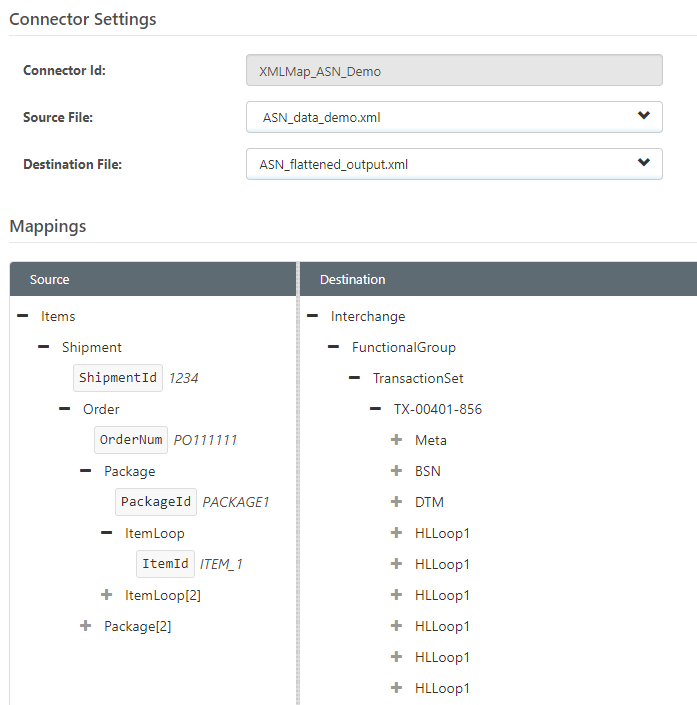
Removing Unnecessary Nodes
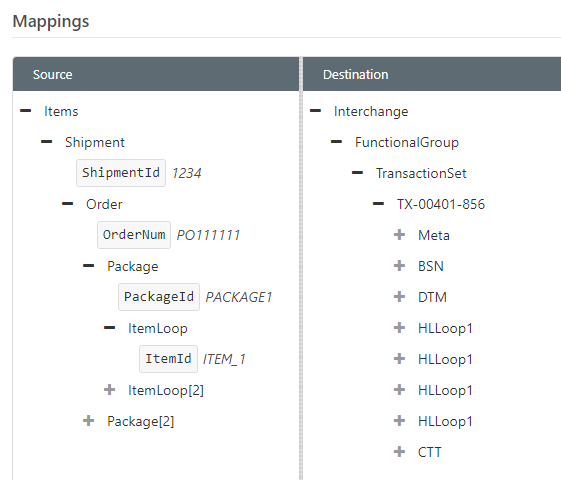
During the mapping, we will create Foreach relationships that tie the number of output elements to the repeated occurrence of input elements (e.g. each Package element in the input will generate a set of output elements with that package data). Since the Foreach relationships ensure that the correct number of output elements are generated, some of the repeated elements in the Destination tree structure are unnecessary and can be removed.
In the Destination, only 4 instances of the HLLoop1 structure are required (one for each type of HL segment: ‘S’, ‘O’, ‘P’, ‘I’).
After removing the unnecessary nodes, the tree structure looks like this:
Add Loop Nodes
Now comes the important step of adding Loop Nodes that allow for Foreach relationships between the Shipment, Order, Package, and Item data without adding XML hierarchy in the EDI output.
Start by creating a new Loop Node for the first HLLoop1 structure (right click the HLLoop1 and select ‘New Loop’):
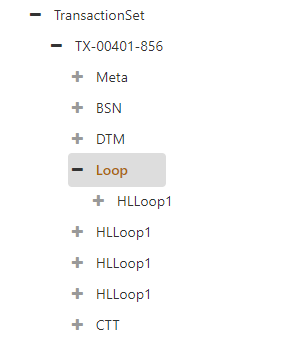
Now drag the next HLLoop1 structure “into” the hierarchy created by this Loop Node (this hierarchy will not be represented in the actual output XML due to the use of a Loop Node):
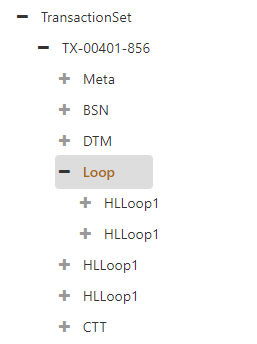
Now add the second Loop Node by right-clicking the HLLoop1 structure that was just dragged into the hierarchy and again selecting ‘New Loop’:
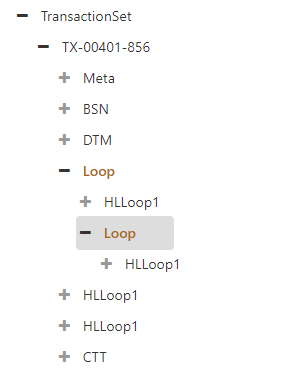
Continue dragging the next HLLoop1 structure into the previous hierarchy, then adding a new Loop Node on that HLLoop1, until the Destination tree looks like this:
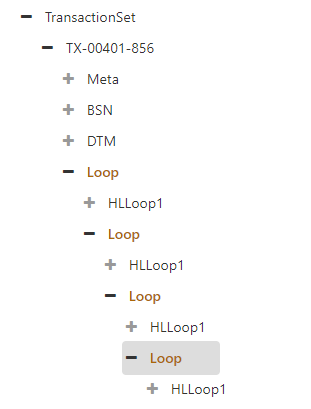
Mapping the Loop Nodes
Now it is time to establish the Foreach relationships with all of these new Loop Nodes:
- Each Shipment should result in a new occurrence of the first HLLoop1 (so drag Shipment onto the first Loop Node)
- Each Order should result in a new occurrence of the second HLLoop1 (so drag Order onto the second Loop Node)
- Each Package should result in a new occurrence of the third HLLoop1 (so drag Package onto the third Loop Node)
- Each Item should result in a new occurrence of the fourth HLLoop1 (so drag ItemLoop onto the fourth Loop Node)
After dragging and dropping these elements to create the Foreach relationship, the mapping looks like this:
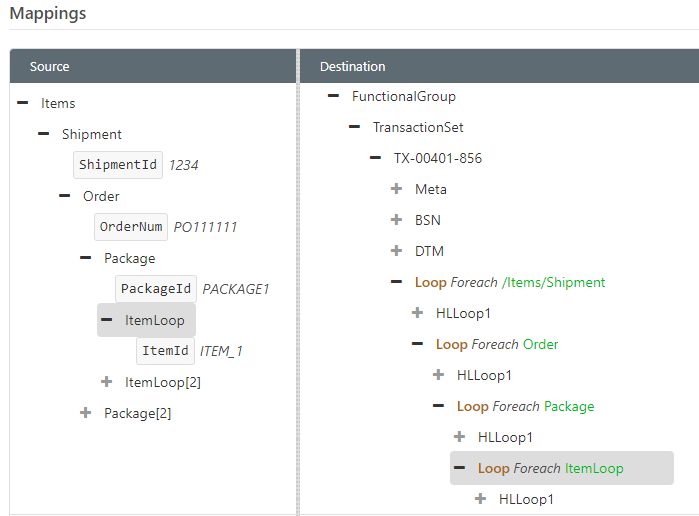
The result is that these Loop Nodes reflect the same hierarchy from the Source data, however, since these Loop Nodes do not appear in the output XML, the hierarchy is entirely logical and the output XML remains “flat”.
Though we have not started to add the HL segment values to the output data, it should be apparent that the first Loop Node will generate HLLoops for Shipments, the second Loop Node will generate HLLoops for Orders, the third Loop Node will generate HLLoops for Packages, and the fourth Loop Node will generate HLLoops for Items.
Assigning Hierarchy Identifiers Through Scripting
At this point in the mapping, the Loop Nodes will effectively flatten the HLLoop output, but these HLLoops still require hierarchy identifiers (e.g. HL01, HL02) to encode the data hierarchy in a flat XML structure. Assigning hierarchy identifiers requires Script Nodes, which are special nodes that allow for executing custom ArcScript.
Script Nodes are virtual nodes (like Loop Nodes) that do not affect the output XML. In this mapping, each Loop Node will have a child Script Node that tracks the identifier for the current Shipment, Order, Package, and Item respectively. This subsection will walk through the full ArcScript required to implement the hierarchy identifier logic.
First, add a Script Node to each Loop Node (remember that nodes can be dragged-and-dropped to rearrange the order in the Destination tree):
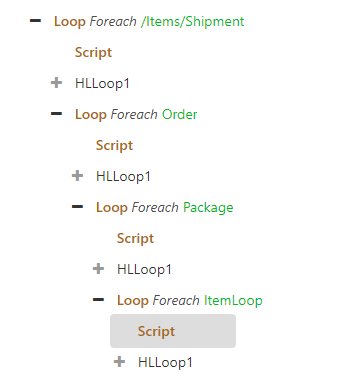
Now we need to fill in the scripts for each HL type (i.e. the Shipment type, Order type, etc). This subsection contains all of the full scripts, below. The next subsection shows how to use the values calculated in these scripts to fill in HL segment values. Finally, the subsection after the next provides an explanation of the scripting logic.
Shipment Script Node
<arc:set attr="_map.currId" value="[_map.currId | def(0) | add(1)]" />
<arc:set attr="_map.currShipmentId" value="[_map.currId]" />
Order Script Node
<arc:set attr="_map.currId" value="[_map.currId | add(1)]" />
<arc:set attr="_map.currOrderId" value="[_map.currId]" />
Package Script Node
<arc:set attr="_map.currId" value="[_map.currId | add(1)]" />
<arc:set attr="_map.currPackageId" value="[_map.currId]" />
Item Script Node
<arc:set attr="_map.currId" value="[_map.currId | add(1)]" />
After adding these scripts, the mapping should look like this:
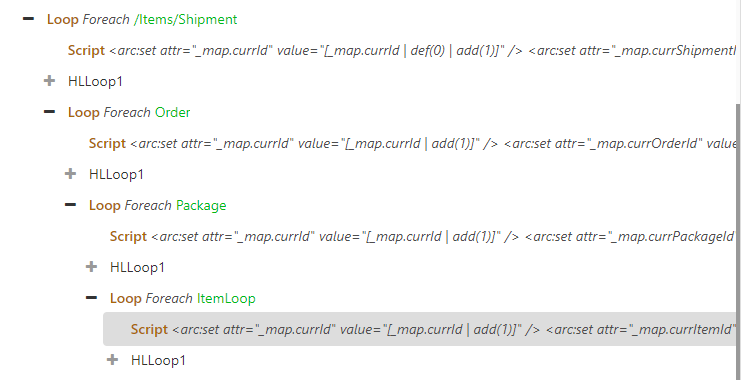
Setting HL Segment Values
The scripts in the previous section calculate the hierarchy identifiers for each HL segment type, and now these values need to be set in the HL elements. There are three relevant HL elements to set:
- HL01 - The current hierarchy identifier
- HL02 - The hierarchy identifier of the immediate parent
- HL03 - The code indicating the type of HL segment (e.g. ‘S’, ‘O’, ‘P’, ‘I’)
HL03
The HL03 element can be set without any reference to the scripts; the first HLLoop1 (i.e. the HLLoop1 under the ‘Shipment’ Loop Node) should have an HL03 value of ‘S’, the second HLLoop1 (i.e. under ‘Order’) should have an HL03 value of ‘O’, the third HLLoop1 (i.e. under ‘Package’) should have an HL03 value of ‘P’, and the fourth HLLoop1 should have an HL03 value of ‘I’.
HL01
The HL01 element identifies the HL segment to be referenced later by any “children” of that segment. The current identifier is always represented by _map.currId in the Script Nodes. So, each of the HL01 elements, regardless of the type of HL segment, can be set to the following value:
[_map.currId]
To set this value in the element, click the ‘Expression’ tool (i.e. the tablet-and-pencil icon) and enter the above value in the Expression Editor.
HL02
The HL02 element stores the identifier for the parent to the current segment. For Shipment HL segments, the HL02 value will always be ‘0’ to indicate that it has no parent.
For non-Shipment HL segments, the HL02 value should reference the current identifier for the preceding HL segment type in the HL hierarchy. In other words:
- Order segments - HL02 references the current Shipment identifier
- Package segments - HL02 references the current Order identifier
- Item segments - HL02 references the current Package identifier
These values are represented in script as [_map.currShipmentId], [_map.currOrderId], and [_map.currPackageId] respectively. So the HL02 values for each HL segment type should match the list below:
- Shipment - 0
- Order - [_map.currShipmentId]
- Package - [_map.currOrderId]
- Item - [_map.currPackageId]
Once all of the HL element values have been set, the segment mappings (Shipment, Order, Package, Item) should look like the following:


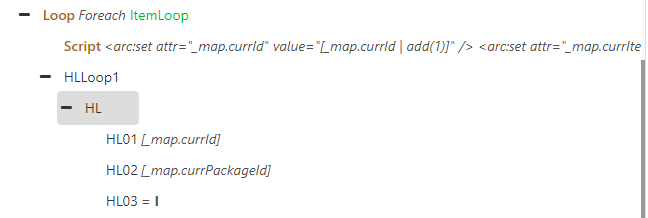
Script Explanation
This subsection explains the scripting logic provided in the previous two subsections, and can safely be skipped by users who are less interested in understanding the ArcScript concepts behind assigning the hierarchy identifiers.
Each of the scripts uses the _map item to store current identifier values; this item is always available within an XML Mapping and the attributes of the item are not cleared until the mapping is completed. This makes it ideal for calculating/storing values that will be referenced later in the mapping.
The _map.currId attribute represents the identifier for the current HL segment. Each Script Node only executes when a new HLLoop1 should be created (i.e. when a new Shipment, Order, Package, or Item is found in the Source data), so each Script Node increments the _map.currId by 1 to generate a new identifier for the new HLLoop1. The ArcScript for incrementing this value is given by the expression: [_map.currId | add(1)].
The first Script Node also provides 0 as the default value for this attribute: [_map.currId | def(0) | add(1)]. This ensures that the attribute starts at 1 when the first Shipment HL segment is created.
Each Script Node (other than the Item Script Node) also sets a “type-specific” attribute to the current identifier: _map.currShipmentId (for Shipment-type HL segments), _map.currOrderId (for Order-type HL segments), and _map.currPackageId (for Package-type HL segments). This is necessary because future HL segments will need to refer to the identifier for an earlier HL segment in the HL02 field.
For all non-Shipment HL segments, the HL02 value is given by the current identifier for the type that is one level “higher” in the hierarchy than the current segment. So, all Order segments will reference _map.currShipmentId as the HL02 value, all Package segments will reference _map.currOrderId, and so on. These values are guaranteed to preserve the correct hierarchy, because the hierarchy of the Foreach loops (i.e. the Loop Nodes) matches the hierarchy of the Source data.
Mapping Additional EDI Data
At this point in the mapping, the HLLoop1 structures have been flattened, and the HL segments contain the appropriate values to represent the data hierarchy in a flat XML structure.
Complete EDI document mappings will involve many more segments than just the HL segments that were the focus of this guide. For help with general EDI mapping, please see the XML Map Connector documentation as well as our Database to EDI mapping guide.
Ready to get started?
Use CData Arc's free 30-day trial to start building your own custom workflows today:
